Edited to add: I don't know what happened to the photos! Google is doing its random acts of weirdness again. I'll get it corrected.
Edit 2: I think it's fixed...maybe.
It's that time of my sewing year for reflection and updates on new year intentions. I'll save the 'sewing year in review' chatter for a future post. For now, I'm sharing the results of Make Nine 2023.

I had good intentions, as always, but did not get to everything on the list. I lost interest in most of the patterns early on and never went back to make any changes. Ah well. I managed to check four of nine items off the list.
McCall's 8286


Version 1 (blue & white stripes): I completed this version back in August. I cut size 16 and made a 1/2-inch FBA. I forgot to copy the FBA to the front overlay and oddly it still fit. Perhaps this piece is supposed to have more drape. I also shortened the dress 6 inches; as drafted it was far too long for my short frame. For this version, I used the curved hem with facings.
I think the fabric I used, although nice, is far too heavy for this design. The sleeves can stand out on their own. Hah! Using snaps for closures made the front even more heavy.


I wore it once in September and felt okay in it. It wasn't fiddly and the heaviness didn't seem to bother me - or I don't remember it bothering me.
Version 2 (gray chambray): For the second version, I used a lightweight tencel chambray; this fabric is much more appropriate in weight. I opted for the straight hem this time and added four inches to the ties.


I should have used a heavier interfacing for the front band because it's a wee bit flimsy. I finished this in October and by that time it was too cold (for me) to wear it. We'll see how it goes in Spring.
Deep Stash > 8 years


I liked having this category as part of the plan as it encouraged me to use some older fabric. I bought this piece a long time ago after seeing an argyle sweater-vest made by another sewer and wanting a similar look.
This fabric has been in and out of various donation boxes for YEARS. I pulled it back out earlier this year and there it sat, mocking me and wondering when it was going back in the box. Haha! This time I was determined to cut the fabric and I'm SO glad I did.
Enter my TNT knit top pattern: Simplicity 9385, sans collar. I used a scrap of wool knit for the sleeves, cuffs, neckband, and hem band. I didn't have enough to make the full hem band width, so I opted for half-width.

The neckband sits quite nicely.

This is certainly one of my favorite versions of S9385.
Closet Core Kelly Anorak

I shared my thoughts about making the jacket here. A clear favorite and I'm so glad I went through with it. It came out exactly as I had envisioned and I enjoy wearing it.
Oro Rosa Magdalena Circle Bag

Another winner from Oro Rosa. She makes great patterns and I enjoy sewing them. As soon as I get my sewing space back together, I have intentions to sew more of her collection. More details about this bag can be found here.
***
Even though I didn't complete the plan, I am happy with the things I made. I carry the handbag often and really love the anorak.
I've not given any thought to Make Nine 2024, though I intend to participate.
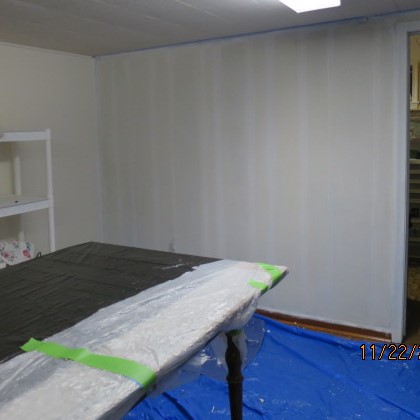
Basement Update:
In my last post, I shared that I started the process of doing small updates in my basement. I've primed all of the wood panels with two coats of water-based Kilz 2 and settled on a top color.
 |
| started with priming the grooves |
 |
| one coat of primer |
 |
| two coats of primer |
This is the first wall I did. I learned later that feathering the paint in the grooves helped reduce the visibility of the paint lines.
 |
| much better |
At first I thought I wanted a nice tan color on the walls, but then I quickly changed my mind when I saw how it looked. Having gotten used to how bright it was in the basement, the tan color felt suffocating.

So I've decided to go with a color by Glidden called Silent Smoke in an eggshell finish; it's the third color on the right (closest to the door trim). I'm going to take the sample jar back to the hardware store to see if they can add a teeny bit more tint to darken it just a little. The next color on the swatch card is called Whiskers. I want something in between, so I'll see if they can make that happen.


(paint chip on the right)
Next is to remove the floor trim, then clean and prime the floor. I wanted to put in a floating floor, but I think peel-and-stick is the way to go. It's a basement and if there is ever another pipe incident, I need things to be easy to clean and not too hard to replace or mend.
I also thought of tearing out the old ceiling tiles and painting the joists, duct work, etc. and redoing the lighting situation. But that's a major job and probably left best to when I have a lot more time. I know it's probably better to do the ceiling before the floor, but I don't have any clear vision for that right now. Plus I really miss sewing and want my space back.
That's all for now. I need to research compound mitre saws so that I can install new baseboard and ceiling trim. I've never used a saw or installed trim before so if you have some tips, please chime in! In fact, any tips or DOs and DO NOT DOs will be helpful and appreciated!
L

I'm going to suggest buying extra floor tiles, as the likelihood of finding them again if you need them in a few years is very small. I have no advice on the saw, except don't be afraid to pencil in the correct cutting angle on the trim. It seems very easy to get the wrong cut by the time you take the measurement and get the trim to the saw. Oh, the laser line that shows where the cut will be seems to be a very popular upgrade on saws.
ReplyDeleteYou made some very nice garments, especially the deep-stash sweater.
Thank you Gail! This is very helpful. I'll be sure to buy extra tiles and to look for carpenter pencils to mark directly onto the trim. Having a laser line is a nice feature and I'll look for that too!
ReplyDeleteIs your floor trim damaged? If not, I wouldn't remove it - just paint it. You can install what is called quarter-round trim after you put down the peel/stick tile to go over the "gap" between them and the baseboard. (If you go that route, there are hand tools for cutting quarter-round that might even let you avoid buying a miter saw - depends on your hand strength.) Then you use caulk to fill in between quarter-round and baseboard. You'd use caulk either way, because nothing will be square and flat and there WILL be gaps, and you'll use it to cover nail holes too. Accurate compound miters can be headscratchers but there are how-to's out there. Most of your cuts won't be compound though. You don't need specific carpenter's pencils and they are actually harder to get a good point on for a fine line because they aren't round and don't fit into a regular sharpener. Regular pencils are fine. DeWalt is "our" brand for miter saws. Nothing specific besides quality and functionality - they just feel right - like my Vikings feel better than a Bernina or Pfaff IYKWIM. LOL And if you can operate a sewing machine, you can operate power tools. This webpage gives you a quick rundown of what you might want to consider for tools. You don't need each and every thing. https://bendtoolco.com/blogs/how-to/awesome-baseboard-tools-for-your-project
ReplyDeleteCongrats on finishing anything on a list. When I make sewing lists, it's usually the kiss of death for that project. I especially like that argyle sweater!
Thanks so much Debbie!!
DeleteThe floor trim is in decent condition. I started removing the quarter-round trim so that I have space to install the peel-and-stick. I was going to remove the other baseboard too, but you make a good point to leave it. It has a hefty shine to it, but I think the Kilz2 will be enough to cover it. I might have to buy new quarter-round because I cannot get the nails out at all! I'm going to snap that 12-ft piece of wood in half if I keep trying to remove those nails.
There is one area where I will have to install new trim. I tore out this old built-in toy chest that was weirdly taking up space. When demo-ing it, I broke some of the trim attached to it. I probably should have saved it, but it's off the Landfill Lane by now. Hopefully I can find a match.
Another friend was telling me about coping saws too. I think if I leave the baseboard and just work with the quarter-round, I may not need to buy an electric saw. I've heard good things about DeWalt! You're the second person to stand by the brand, so if I need to go that route, I'll definitely check them out. My loyalty is to reliability. =)
Thank you for sharing the link! There is SO much good information there.
Glad to help! Another thing to remember - do NOT be a perfectionist. It's trim at floor level and no one, including you, will ever notice it as long as it's painted to match everything else, especially once furniture or whatever is moved back into place. And caulk will fill in any and all gaps. Ask me how I know. LOL Also, if you DO need an electric saw, Home Depot and Lowes do rentals. Saves on having to store the thing later. Feel free to email me if I can answer any questions. I'm not a carpenter, obviously, but my son and I have done this many times in his rentals and in my own homes so I do have a bit of hands on experience.
ReplyDeleteOh it definitely won't be perfect! LOL I have come to love the caulk gun and its magic properties. I will certainly email you for questions. Thank you!!
Delete